We’re often asked for class lists, somewhere you can print all classes in one go with each class on a separate sheet.
The quickest way to do this is to navigate to Office > Reports and choosing the Class List report.
On the next page, use the tick boxes to select individual or multiple year groups.

Next, use the drop-down menus to group the lists by year group or by class, and select the appropriate year (i.e. 2022/23). You can also choose whether to include any Pre-Ads to the list as well.

Once you have made your selections you can create the class list in 3 different ways.

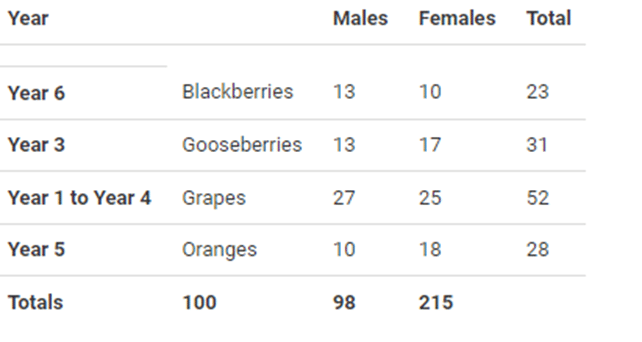
‘Run Summary’ will create an overview, showing you the number of males, females, and the total number of pupils in each year group or class, based on the selections you have made.
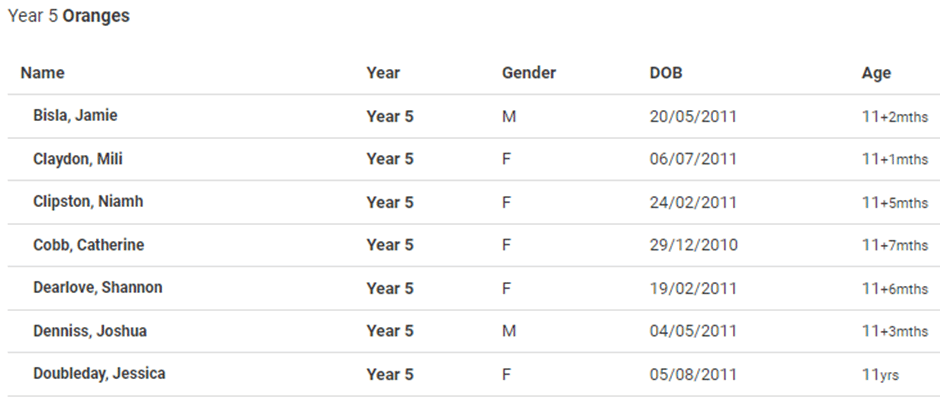
‘Run with Pupils’ will create a list showing all of the individual pupils in the class or year group selected, as well as detailing their Year Group, Gender, Date of Birth and Age.
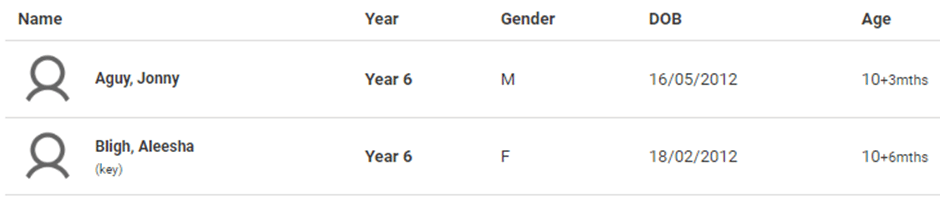
‘Run with Pictures’, will create a list identical to the Run with Pupils option, but the individual pupil profile photo’s will be included next to each pupils name.
Once created, your class lists can be printed or downloaded by using the appropriate icon at the top of the page.

Sometimes schools want different data in the report, but as the Class List report is ‘hard coded’ we can’t tweak it. Up until now we’ve generally advised schools to go to Pupil List, choose the columns they want and then Filter each class, one at a time, printing as you go along.
This is fine for a school with four classes, but not so great for a school with 24 classes!
For larger schools, you can use Excel to automatically put in page breaks on change of data. That means you can go to Pupil List, add in whatever columns you like and then Download to CSV and very easily make class lists.
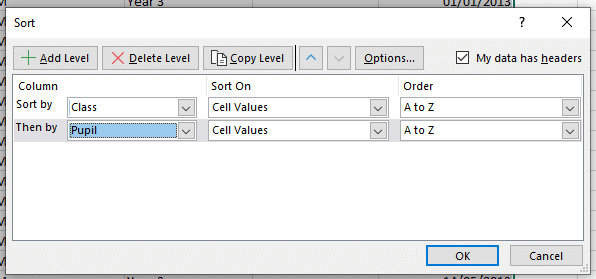
Once you’ve downloaded the data from Pupil List as a CSV and opened in Excel, go to Data>Sort and make sure the data is sorted by Class (then by Pupil).
Go to Data > Subtotal.
Select the following options:
- At Each Change In: Class
- Use Function: Count
Tick the following options:
- Add subtotal to Class
- Page Break Between groups

Excel will then add Page Breaks after each class. Of course, because it’s in Excel you can also change the Font/Size/Colour etc.