To add a single pupil to the system, navigate to Pupils > Pupil List.
Once in this section, click on Add New Pupil this can be found in the top left corner.
A box then should appear.
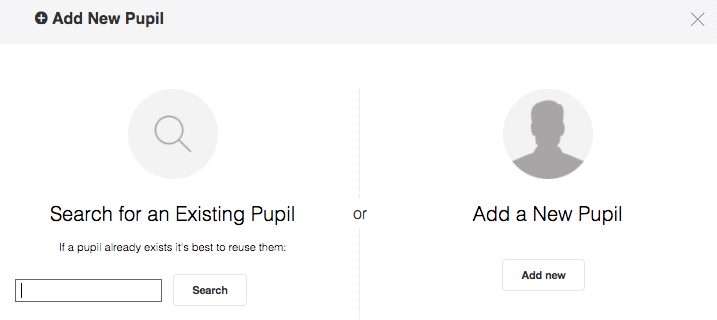
Before adding a new pupil, check that they have not already been entered on to the system by searching for them by their surname. Alternatively, click on Add new to start inputting details for the new pupil.
Fill out the pupil details and press Save.
The child’s record now exists for further information to be added via the Edit tab of their profile.

Fast Add
Navigate to Pupils > Pupil List.
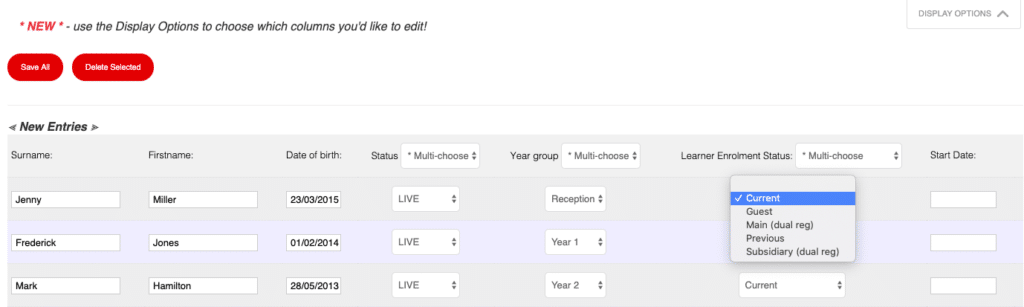
Click on Fast Add.
A table appears in which you can enter more that one pupil’s basic information: Name; DoB; Status; Year Group; Learner Enrolment Status; and Start Date.
The Status dropper allows you to select Pre-Ads (pre admissions) as well as Live (current) (pupils).
The Learner Enrolment Status allows you to select Current, Guest and Dual Registered.
ATF/CTF Import
Pupils’ details can be imported via the Import Wizard.
Navigate to Admin > Import.
Click Choose File and locate the file to be uploaded.
Once the file has been chosen, click Upload. This will bring you to a Summary page for the ATF/CTF you are about to upload.
If required, elements contained in the file can be de-selected but, by default, the system will attempt to load all elements contained in the file.
Click Continue, after adding a start date at the bottom of the Summary page, to commit the CTF to Pupil Asset.
NB: You may have already added a pupil onto the system and want to populate the rest of their details with an ATF/CTF. Pupil Asset matches on Firstname, Surname, DoB and UPN (if it exists. If the names/dates on the system do not match with the import file, a new pupil will be created. Matching pupils are in Green and new pupils will be red. The last column shows where the pupils will be imported.
CSV Import
First, create the excel document with the pupils’ details (First name, Surname, Date of Birth etc.), in the format outlined below.

Save the Excel file as a CSV (Comma delimited) file, go to Admin > Import and choose the file.
If you are adding pre-admission pupils for the following year, give them a Start Date for the next academic year and Pupil Asset will automatically add them as Pre-Admission pupils.