Quick Set-up (no changes to formative frameworks)
Turn on the Foundation Frameworks you want to use.
Navigate to Admin > Schools Options and click on Frameworks in the menu down the left-hand side of the page. Click All Frameworks and tick all NC Foundation Subjects you want to assess. These frameworks will be added to your account and can be viewed under Results > Multi Tick.
Customising existing frameworks
NB: These principles below can be applied when making changes to any school owned or created frameworks.
Navigate to Admin > Schools Options and click Frameworks in the menu down the left-hand side of the page.
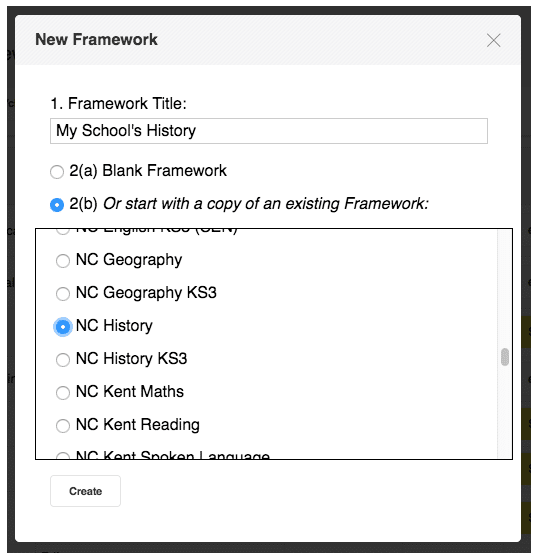
Click Create/clone Framework. Choose which Foundation subject framework you would like to adapt.
Press Create. This will take you through to the settings page of your newly created framework. Much of this can be left unchanged.

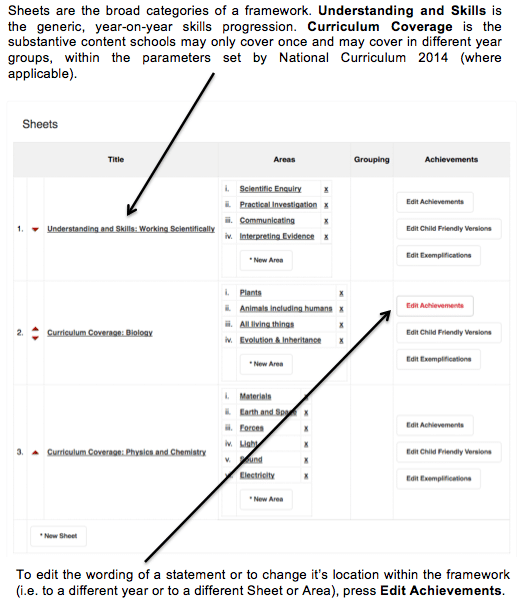
Scroll down to the sub-heading Sheets.

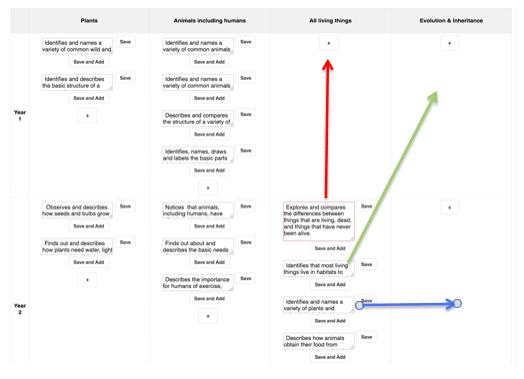
Having clicked Edit Achievements, text boxes containing the assessment statements will be displayed. Statements are structured by Area along the top of the page and by Age Level down the side of the page. Area refers to the skill-strand which the statement belongs to. Age Level refers to the year group or Key Stage within which the statement should be achieved. In most cases, statements that relate to Understanding and Skills are found in the relevant year group whereas statements which relate to Curriculum Coverage are organised by Key Stage. If desired, schools can copy and paste end of Key Stage statements into the relevant year group.
If you intend to add all Curriculum Coverage statements to a specific Age Level, it is sensible to then delete the Key Stage Age Level as this will be empty. Find out how to do this below.
To edit the wording of a statement, simply click in the text box and delete or type as normal. Add an additional text box by pressing the + button. You will need to click Save after editing a statement or Save and Add to also introduce a new text box.
To restructure a framework, simply copy and paste statements into new text boxes. Statements can be moved into a different age-related expectation, into a different area of the curriculum or a combination of these two.

Once your statements are completed and you have pressed Save, scroll to the top of the page and click your framework name which will be underlined in blue. You can now navigate around Pupil Asset in the normal way.
Assessment Statuses: ‘Achieved’ or ‘Unachieved’ (Optional)
During trials, teachers reported that having more than one assessment status was too onerous for the foundation subjects. As a result, Pupil Asset Foundation frameworks simply have Achieved/Unachieved assessment statuses in place.
Should you wish to delete the Achieved status and introduce your own terminology, follow these steps:
Scroll up to Statuses.
Change Statuses by renaming existing Statuses and changing their colours (click on the colour box to open the palette). Then click Save All.
Remove existing Statuses by ticking the relevant box in the Select column and then clicking Delete Selected at the bottom of the table.
Adding new Statuses Under New Entry:
- Enter a title for your Status.
- Choose a colour for each Status. To do this, click in the FFFFF box and choose the appropriate colour.
- If you wish, assign a Weighting to your various Statuses. This enables a Weighted Percentage to be calculated.
- Press Save All and the Age Level will appear.
Removing Age Levels (Optional)
Where Curriculum Coverage statements are given as end of Key Stage expectations, schools may want to copy and paste these statements into specific year groups. It is now sensible to delete the Key Stage Age Levels as these will be empty.
Under Age Levels, tick the relevant box(es) in the Select column, indicating the Key Stage Age Levels you want to remove.
Click Delete Selected at the bottom of the table.
Age Levels related to a specific year group can also be deleted, but these may contain Understanding and Skills statements and may contain Curriculum Coverage that will be lost.