Parental permissions are an important part of school data and essential to ensuring schools comply with the data requirements of the GDPR (for more information on this, read our GDPR blog post)
Typical parental consent requirements are whether a pupil can have their photograph taken, if their information can appear on the school website and whether they’re allowed on regular school trips.
Pupil Asset lets you record any type of parental consent relevant for your pupils and also allows you to access that data in a number of useful ways.
Recording Consent
To record Parental Consent for an individual, simply search the pupil’s name (or click on their name in the Pupil List) to open their Pupil Profile.
Click on their Edit tab and then scroll down to Parental Consent.
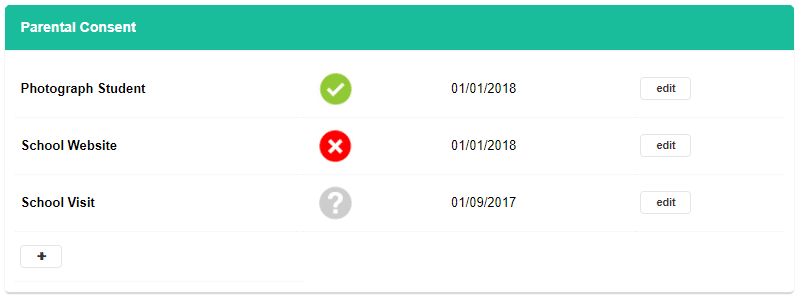
This tab will then show any consent types that have been given, denied or requested as well as the date this was recorded.
You can click the + symbol to record a new parental consent for this pupil.
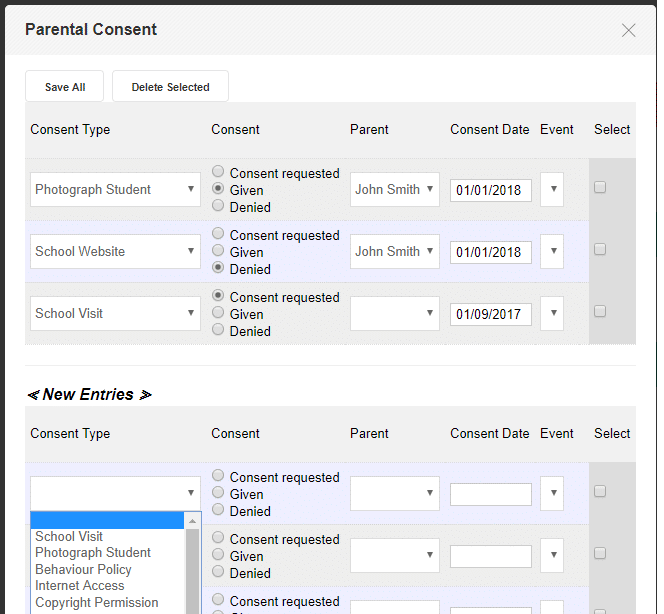
The following screen will then let you edit, update or delete existing parental consent records as well as record new ones against the relevant parent and consent date (if known).
Creating a new Consent Type
If your school has just started recording a new category of parental consent you will need an AdminPlus user in your school to create this under Admin > Advanced > Pupils.
Included in the list of functions on this page is the Consent Setter which can be used to bulk set a specific consent type as Requested or create and name a new consent type.
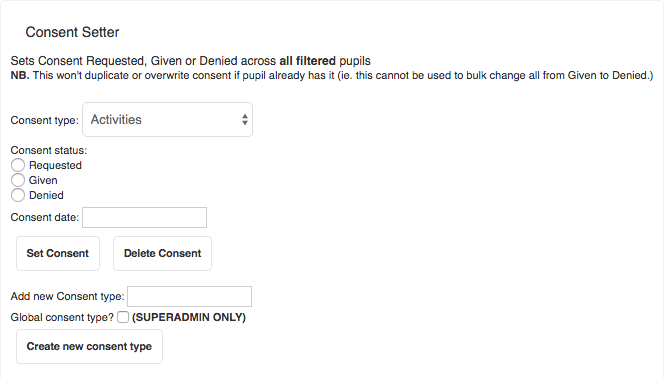
When bulk setting Consent Requested, it’s important to know that this will only be set for the pupils currently selected in your Filter. It will also only record consent as requested for pupils who do not already have a record for that consent type (so will not overwrite consent given or denied).
Filtering by Consent
Pupil Asset allows easy access to your consent data via the Filter.
If you navigate to Pupils > Pupil List and open the Filter, you will find an area called Social Factors.
This contains the Consent filter options.

Here you can select multiple consent types and the consent status you want to filter to.
For example, ticking Photograph Student and Website and selecting Consent Given will filter your Pupil List to only pupils who can be photographed and have photos on the website.
You can also change the consent status to Consent Denied/Requested/Not Set which is a useful catch-all for pupils who have not been given explicit consent for a specific consent type.
Once your Pupil List is filtered, you can use Choose Columns to add further contextual data to your list, tick all pupils and use Pupil Actions to message the pupils selected, or take your data out of Pupil Asset using the Print and Download symbols on the red bar.
Exporting Parental Consent Data
Pupil Asset lets you export all your data in one simple report.
Admin users can go to Admin > Export > CSV Format > Query Builder and select the Pupil Consent List (SQL) report.
Set Limit to: Unlimited and click Downloadas CSV to export your data.
Importing Parental Consent Data
Pupil Asset lets you import consent data via a CSV spreadsheet with just two columns.
The first column should contain PupilUPN, and the second should have the full title of each consent type that child has been given – each separated by a comma (e.g. Photograph Consent, School Website, School Visit).
For more information on importing CSVs, read our full guide here.